

I firstly set about googling to find others who have diy-ed their own - Love Maegan, Vintage Farm Furniture and Katrina From The Block were some of the tutorials I used to get an idea of how to tackle this DIY.
Here is the Vintage Movement DIY pictorial Juju Hat demo...
To make a 60cm or 23" Juju style headdress you will need
Strung feathers - I used approx 3.6m or 4 yards (2 of white and 2 of burgundy)
Card board or backing board
Marking pen/ texta
Scissors
Hot glue and glue gun


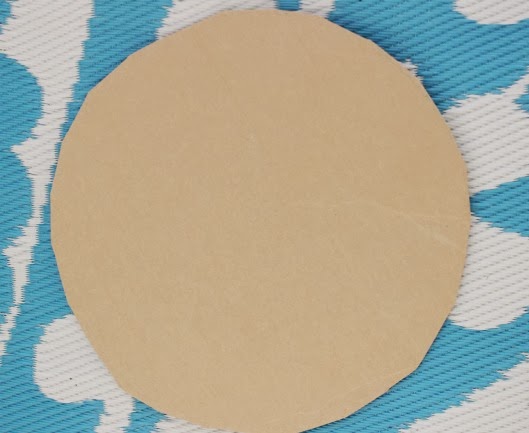
Step 1. Find a round platter, bucket or mat to trace around with a diameter of about 35cm. Trace around and cut out the circle.

Step 2.
Taking our strung feathers and glue gun place glue dots around the edge of the circle and apply the feathers to the outer edge as seen in the image below.


Step 2.
Snip the feather string once you have covered the entire egde of the circle with feathers and then make a loose circle with the remaining feathers inside the circle as shown below - this will give you an idea of where to place and glue the next row. I spaced the row about 1 or so inch apart (you can make your rows close together or spaced as wide as you like). Then glue the second row.


Step 3.
Now continue with your third row of measuring and then gluing. For me this meant switching to my darker feathers. As these feathers were slightly curved I chose to glue them curve side curling up.


Step 4. Final step
To cover up the inner row and ribbon edge simply curl a small section of feathers and glue to fasten. Then glue this to the center over the final round row/ring.


xx
No comments:
Post a Comment
I just love reading comments, thank you for taking the time and for stopping by!