Thursday 28 November 2013

Honeycomb Paper Fan Decoration Haul - Christmas Decor


Lately I've been drooling over the amazing range of boutique vintage style paper products and decorations available in store and online. Last year I shared my honeycomb paper bell haul and this year I found a few more paper decorations to share with you and best of all they were bargains!.

I found these paper fans at The Reject Shop and Coles for the princely sum of $7 - total!. The large white fan was $4 at Coles and the set of 5 multi coloured fans were a bargain at $3 from The Reject Shop. For any local shoppers - both stores are also now selling ready made tissue pom poms for around $2 or $3 each, which takes the hassle out of folding and trimming, for time poor decorators - lovely!. For international shoppers I have found a few paper balls and bells on Ebay at great prices let me know if you need some tips finding them.

Also I was thinking, for those less camera shy than myself, a display like this would make a fab background for your festive season family snaps.


xx
happy decorating!

Wednesday 27 November 2013

How To Clean Make Up Brushes - Johnson's Baby Shampoo

Today I'm sharing the technique I use to clean my make up brushes. The true experts use a few different methods but I have included my wash, pat and dry technique for anyone wanting a get in and get out approach. I like to do this once a month or once a week depending. FYI if you have invested in really high end makeup brushes I definitely suggest following a slightly more hands on approach then this.


You will need:
-2 -3 tsp Baby Shampoo (10 -15mls) - I use Johnson's
-1 cup warm water
-Bowl
-Towel

1. Fill your bowl with water and add the baby shampoo (if your brushes need a deeper initial clean add a bit more shampoo)
2. Place your brushes in the water and let them steep for about 1 minute.
3. Use your hands and gently massage the makeup out of the bristles then rinse each brush under the tap
4. Pour out the water from the bowl and refill with 1 cup warm water and 1 tsp baby shampoo
5. Soak your brushes again and massage
6. Run under lukewarm water and gently rub the brushes, when the water runs clear you are done. Repeat steps 1-5 if your brushes still need further cleaning.
7. Using your towel pat and gently press the brushes to relieve most of the moisture
8. Gently reshape the bristles and lay them flat to dry


xx

Monday 25 November 2013

Super Simple & Fun Tropical Themed Gingerbread Cookies


With Christmas just 29 days away I have started baking cookies with a dash of cinnamon and ginger filling the house with the aromas of the festive season. 

I'm having my nephews over this afternoon and wanted to surprise them with a sweet homemade treat so I whipped up a batch of "Gingerbread a la Tina", thawed out some left over frozen butter cream and got to decorating my tropical holiday themed gingerbread cookies - fitting for the start of summer here in Australia!.

To replicate this super simple look all you need is baked gingerbread biscuits, butter cream (1:2 ratio butter to icing sugar, dash of vanilla extract, dash of cream or milk to bring it together), Star tipped piping nozzle, and a packet of sprinkles.


place your butter cream in a piping bag fitted with your nozzle, then lay out the biscuits and start piping the flowers. You can practice using a piece of baking paper first till you achieve the desired look. Then top with sprinkles and that's it!.


I used a dash of green food colouring mixed with white sprinkles to create a grass skirt effect.


 xx

Wednesday 20 November 2013

Let There Be Light - VELUX And My Renovation Wish List!


Sponsored post

There is no getting around it we've all gone reno, DIY, attic room and construction mad!. I can barely leave my street without stumbling over a cement truck or pallets of tiles on the nature strip and I love it and hate it at the same time. I love the idea of knocking out walls, tastefully extending homes, building new kitchens and opening up living spaces but I hate that I can't join the renovation/revamp crew as yet but there is hope I will one day!. In the mean time I have my list of dream suppliers, contractors and advisers... Obviously Grand Design's Kevin McCloud is at the top of that list (one can only dream!!).  

I love period architecture, having grown up in both Edwardian and Art Deco homes, and would love to live in and own a home of this era. The first thing on my period home "dream renovation list" would be to open up the rooms and let light in. When my sister renovated her Deco Bungalow some years ago, she knocked out a couple of walls and added a pair of french doors and the entire space was transformed into a light and airy hub. Natural light is so important in a living space - it's refreshing, calming, evokes happiness and promotes creativity all round!. I used to think renovating stopped at knocking down walls, painting, ripping up carpet and decorating but adding windows and glass panels can completely transform a space no matter how big or small.

With that in mind I'm loving the high quality range of roof solutions and window fittings by the world leading designer group VELUX®. The pinterest worthy images below are just some of the wonderful installations they offer including Roof Windows, Skylights, Tailor Made Blinds and Shutters, Home Automation Systems, Solar Panels and Sun Tunnels. Most definitely on my future renovation wishlist, The VELUX system can transform a dark attic or roof space into a light filled energy efficient loft worthy of inner city Manhattan!. No matter the type of roof be it high and pitched, low pitched or just plain flat VELUX seem to have an efficient solution for opening up a space, letting in light and a snap shot of the surrounding skyline. I really like the idea of positioning windows so they frame the surrounding environment creating living, evolving, natural works of art and the VELUX system allows you to create and maintain this at the touch of a button.  

velux
VELUX - here via pinterest

I'm also loving VELUX commitment to sustainable living with high tech window glazing that not only reduces outside noise but blocks both heat and/or cold. Their Solar Panels alone are capable of supplying up to 60% of a households water heating needs. These guys are true market leaders in all things "natural light" and have collaborated with a number of world leading architectural firms creating to the minute sustainable living on a grand scale. In their continued commitment to sustainable carbon neutral living VELUX have devised a product life cycle assessment that evaluates their products from the manufacturing process and beyond more impressively "All the energy consumed in a VELUX roof window’s lifecycle is balanced out and even exceeded by the energy gained in the heating season during its use."

velux cati kati teras balkonu13
VELUX pinterest

These guys are certainly on my go-to list of suppliers and there are three Australian based VELUX showrooms for when that time finally comes - YAY!.


xx

Saturday 16 November 2013

Mexican Inspired Day Of The Dead Sugar Skull Cake Tutorial

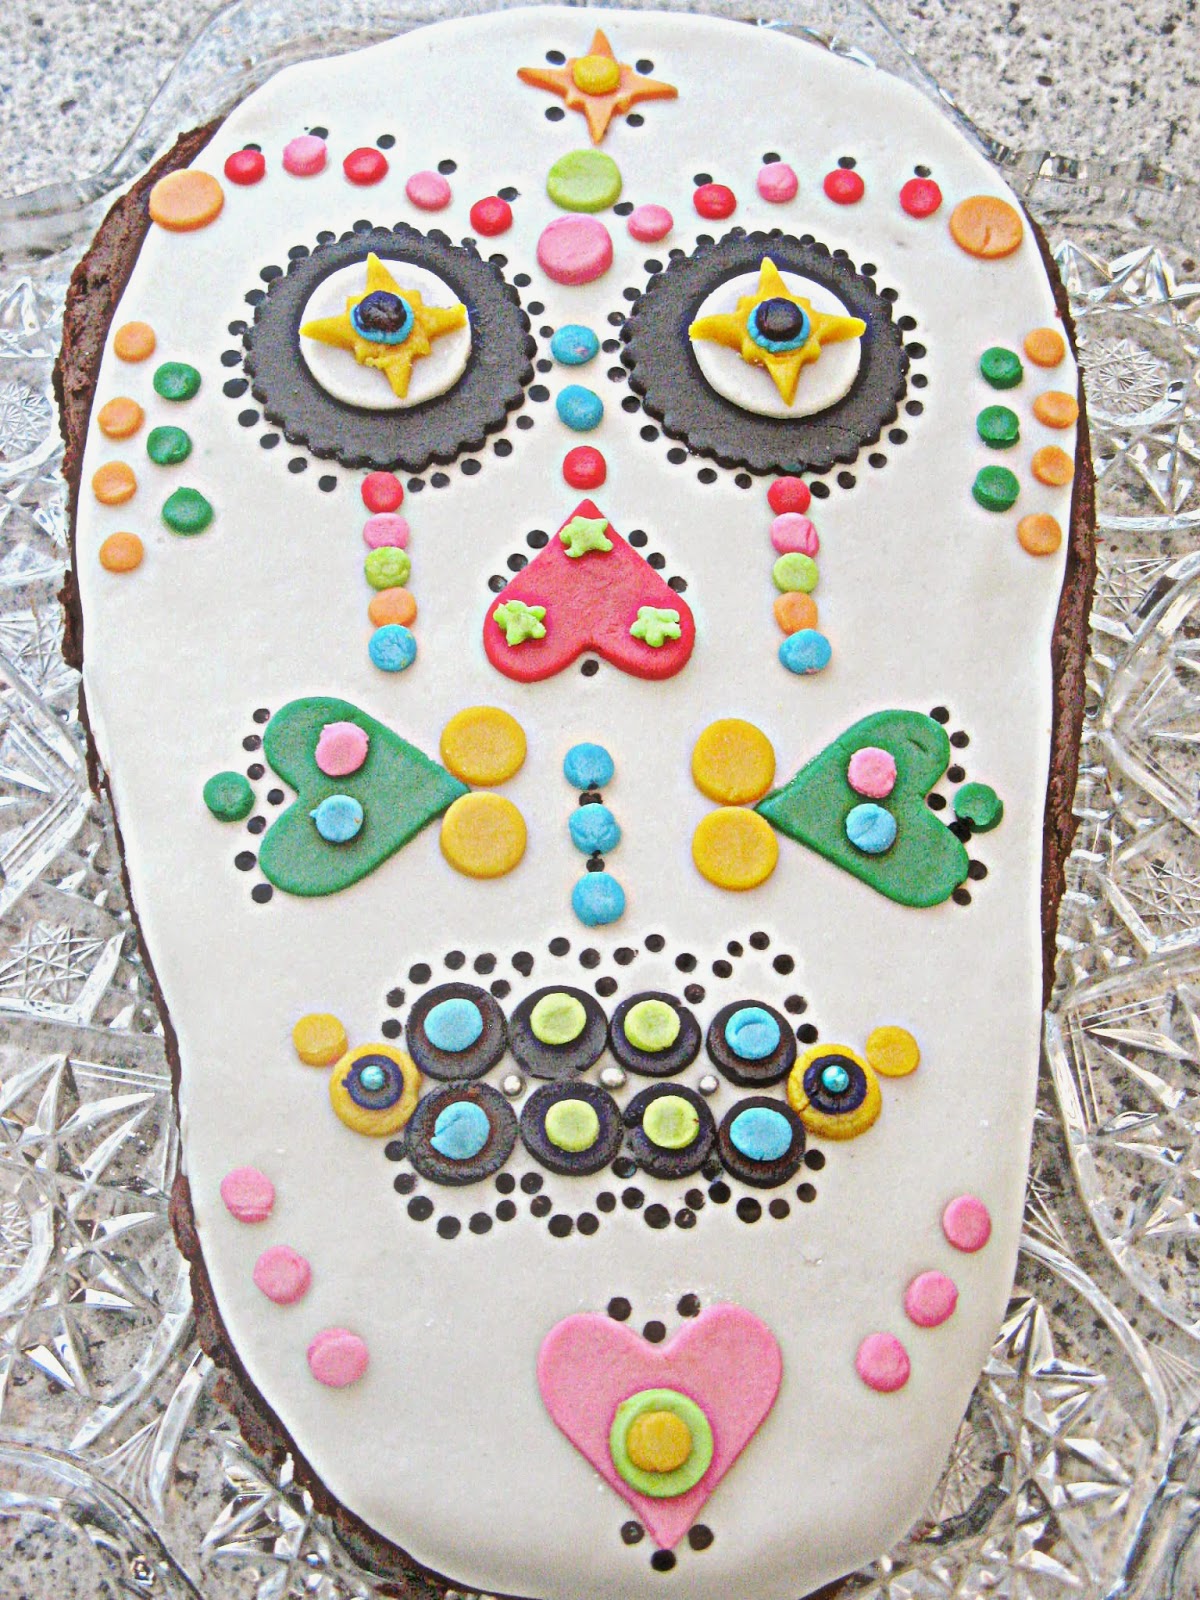
I know this post is a bit late in the making but I thought it worth sharing just the same. For Halloween this year I decided to make a Day of the Dead Sugar Skull Cake inspired by the well known Mexican celebration that runs from the 31st of October to the 2nd of November. The decorations used to commemorate this holiday are simply amazing and I wanted to try my hand at replicating a sugar skull in fondant.

To create this design I used cookie cutters and piping nozzles to shape the fondant. You can be as creative as you like with your shapes so don't despair if you don't have the shapes I have used just experiment with the mini cutters and piping nozzles you have at home. At the least you will need some circle cookie cutters large enough to create the eyes and also some small ones to create smaller dots for your design. I also used a heart shaped cutter for the nose and the smaller dots were created using Wilton No. 12 and 1A round piping nozzles.

You can also paint the design on using gel food colouring or you could pipe royal icing onto the cake to create the design.

For the cake component I made two 20cm round chocolate cakes. You will need the cakes to be the same height.


Tutorial

1. Shaping your cakes
Take your cakes and lay them out as seen in pic 1. (below) then start to carve them as seen in pic 2. you are aiming for as close to the shape in picture 3. and finish by covering the cake in either butter cream or ganache.

I used buttercream for this recipe
500grms icing sugar 
250g butter (softened)
1 tsp vanilla extract
cocoa to taste (for chocolate butter cream)
Pinch of salt (optional)
Mix well using an electric mixer - add a dash of cream, hot water or milk to incorporate if needed.


2.Fondant
I make my own fondant but you can use store bought varieties and simply colour them to suit your design. I add liquid or gel colour and mix it through white fondant till I achieve the desired colour.

3. Cutting Your Shapes 
Now you are ready to start cutting out your shapes and arranging your design. I cut a piece of kitchen towel to shape and laid the fondant pieces out before placing them on the cake, this way you can make changes as you go.


4.Covering the cake
Now its time to cover the cake in white fondant 
I'm a slap dash kind of baker so cut the white fondant without measuring it first... as a result the fondant didn't fit flush across the cake so I'd suggest tracing a template from baking paper cutting it out and then using it to size your fondant correctly.

5. Fixing your cut outs to the cake

First simply lay your entire design out on the cake before sticking it down to the fondant making sure everything looks balanced and is where you want it to be. Then you can start adhering the shapes to the cake by simply wetting the back the fondant pieces and placing them down on the cake.


To create the stamped ink dots I used gel colouring and the end of a chopstick


Sharing
Rooted in Thyme's Simple and Sweet Fridays - here


xx

Friday 15 November 2013

Pantone, Caroline Gardner and Ikea Christmas Card Haul

5 and a bit weeks - seriously - 2013 where have you gone and Christmas how are you here so soon? Still, I'm certainly not complaining, I love the festive season and I kicked off my Christmas shopping this week with a bit of a card and paper haul.


Ikea paper bags $2.99 for 12 - I have some crafty plans for these babies!

I love Pantone merch and this card and envelope set will be perfect for my artsy-fartsy friends and loved ones :).

xx